First setup of Turris MOX (CPU Only)⚓︎
This page is written for users who would like to configure their MOX device with only one Ethernet port. It means you have no SFP module (MOX D) and no Ethernet module (MOX C or E). You may or may not have other modules (MOX B, F or G).
Why is there a special page? Your device has only one network port and you have to decide if you would like to configure it like WAN or LAN and how to manage a connection to the internet.
Because we want to make the first setup smooth, Ethernet port will be set to LAN at the beginning of the first setup. You shouldn’t connect your MOX directly to the internet. Configure it somewhere in safe environment – like your local network or directly connected to your computer. Later on, you can change the purpose of your only Ethernet port.
Cable setup for configuration⚓︎
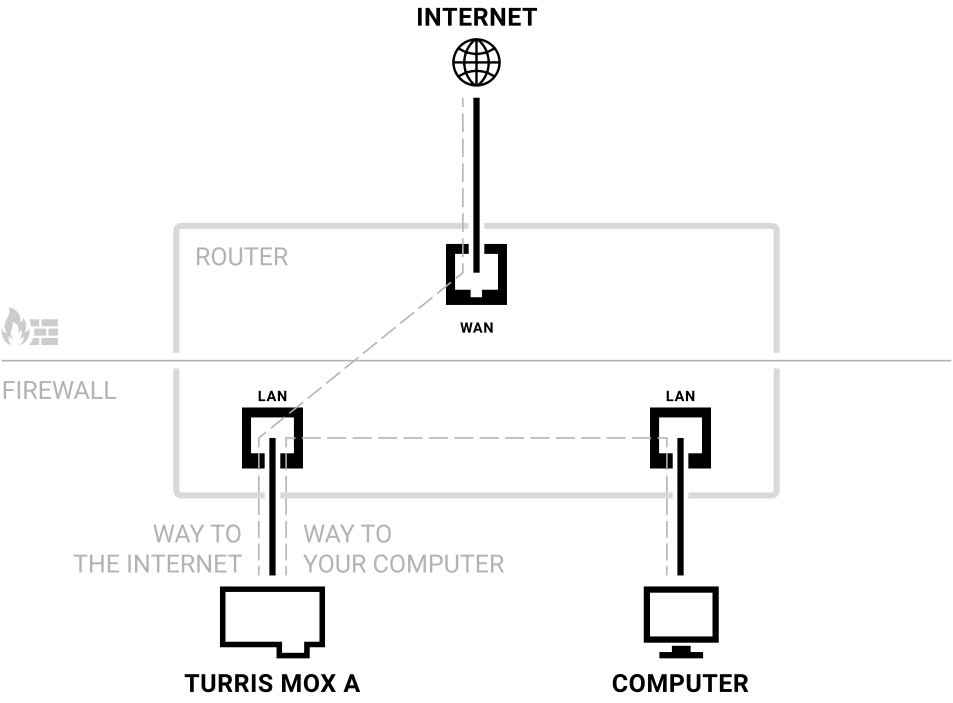
You shouldn’t connect your MOX A directly to the internet.

You can connect your MOX A directly to your computer, but your MOX A wouldn’t be able to connect to the internet during the first setup and download any updates, which is not recommended. Some steps in the configuration guide (like checking the internet connection) could fail because of that, but it should be usually OK.

If you have a working local network with dhcp behind a firewall and you can somehow list IP addresses of newly connected devices, it is recommended to use it for MOX A configuration. In this setup, your MOX A will be able to connect to your computer as well as connect to the internet.
Important
Make sure you use a proper Gigabit Ethernet cable, i.e., a Cat 5e or Cat 6 straight unshielded twisted pair cable with 8 wires (8P8C).
Installation steps⚓︎
Before you start⚓︎
If you didn’t buy a complete set or if you bought some extension modules, make sure everything is connected and put together before starting your MOX for the first time and before connecting it to the power supply. Make sure to connect all desired MOX modules in a correct order. Commonly used setups are ABC, AB and AF. We recommend to check the correct combination of modules and their interoperability in our MOX configurator.
Warning
Shut down your device and disconnect it from the power supply before connecting or disconnecting modules and/or upgrades. The hardware configuration of the device can not be changed at runtime.
Setup⚓︎
Firstly connect your computer to a MOX A either directly via Ethernet cable or indirectly by connecting both MOX A and your computer to the same local network. Then connect the power supply.
Wait for your MOX to boot up. During boot LED will shine red and once booted up, it will start blinking in heartbeat pattern (blink-blink-pause).
First boot can take a while. During that, MOX detects hardware and decides what configuration it is in. It also tries to detect running DHCP server and if it finds one, it will switch itself into DHCP client mode. If it doesn’t find one, it will configure itself as DHCP server.
If it is connected directly to your computer, you will end up with running DHCP server on your MOX. If connected to a local network, probably there is already running DHCP server, in that case MOX, will be its client.
Tip
If you have a working zero-conf on your conputer, you can access your router via http://turris.local address.
When booted, you can access the first-run wizard by using a web browser and entering as URL address of your router. In case of your MOX running as DHCP server, web interface will be at http://192.168.1.1. If it ends up being DHCP client, you either have to use administrative UI on your DHCP server (your main router in most cases) and figure out IP address of your MOX, or you can use zero-conf address http://turris.local if your computer is configured correctly to use those.
If you want to change the purpose of your only Ethernet port from LAN to WAN you can do so in an administrative interface after finishing the guide and after setting up a way to access your router.