GPIO (general purpose input-output ports)⚓︎
GPIO ports are ports that can be controlled by a user program. Their location and numbering on the board can be found here.
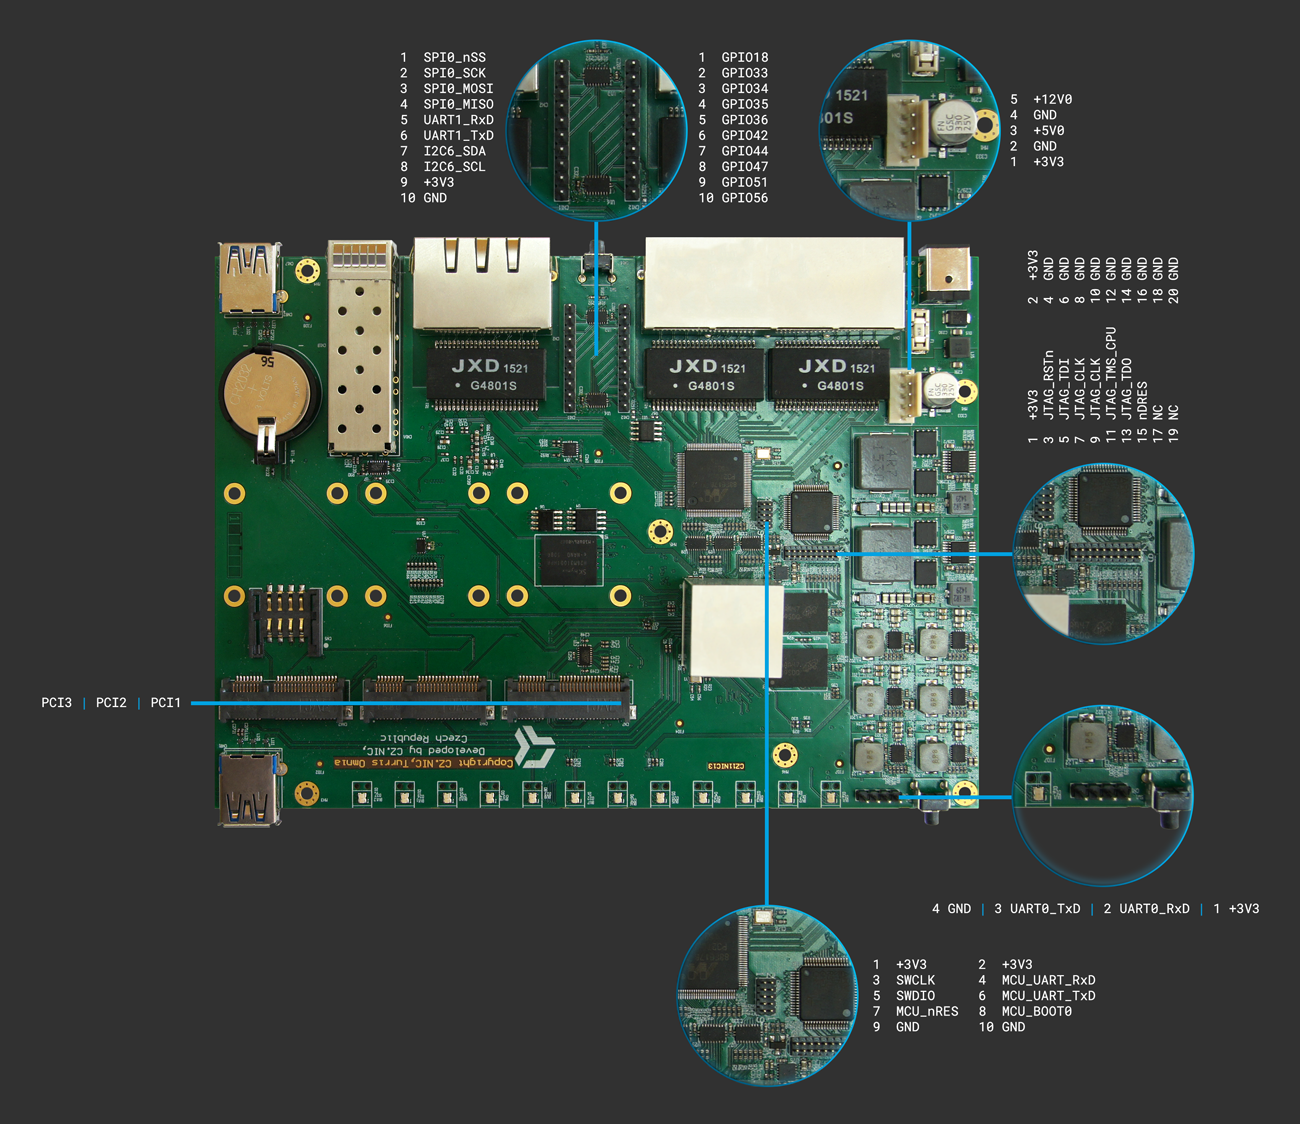
Maximum electrical characteristics of GPIO ports:
| Voltage | 3.3V |
| Current | ±5mA |
Important
When the electrical parameters are violated, proper function of ports is not guaranteed and the router can get damaged permanently!
Shell⚓︎
GPIO ports can be exported to the file system so they can be controlled by a simple shell script as well.
The first step is to export the GPIO port which we will be working with. This can be done by entering the port number into the /sys/class/gpio/export file. An example for GPIO18 follows:
echo 18 > /sys/class/gpio/export
After exporting the selected port, the /sys/class/gpio/gpio** folder is created automatically where the asterisks are replaced with the number of the GPIO port. For port 18, it is /sys/class/gpio/gpio18. The direction and value files in particular can be found in this folder. The first of these files determines whether the port is set as an input one, or as an output one. The corresponding values in the file are in and out. The function of the other file, value, depends on the setting in the direction file. If the port is set as an input one , the value file contains the current state of the port (0 for the low voltage level and 1 for the high voltage level) and it cannot be written to. If the port is set as an output one, zero value can be written to the value file for the low voltage level or a non-zero value for the high voltage level. It is also possible to read the set value back in the same way as when the port is set as an input one.
Setting the port as an input one and reading the state is therefore possible in the following way:
echo in > direction
cat value
Setting the port as an output one and setting the high voltage level is possible in the following way:
echo out > direction
echo 1 > value
Python⚓︎
Shell is sufficient in case of simpler operations but it is better to use a full-fledged programming language like Python for more complex programs. The GPIO Python library has been ported to Turris; originally, it was created for Raspberry Pi. In order to use it, you need to install the python-turris-gpio package first.
This guide only covers the basic use of the library. It does not describe all the properties provided by the library. Further and more detailed information can be found in the documentation for the original version of the library.
Initialization⚓︎
The first step to use this library is to import and initialize it. The library is initialized in the BCM mode where port numbers correspond to their designations on the chip. This is the same as on the pinout picture.
import turris_gpio as gpio
gpio.setmode(gpio.BCM)
Next, we set the ports that we will control.
gpio.setup(18, gpio.OUT)
gpio.setup(33, gpio.IN)
The first argument of the setup function is the port number and the second argument is either OUT for an output port, or IN for an input port.
Output⚓︎
Ports that are set as the output ones can be then controlled using the output function. This function accepts the port number as the first parameter and the voltage level as the second one. It can be True for the high level or False for the low one (alternatively also 0 or gpio.LOW resp. 1 or gpio.HIGH).
An example is shown in the following code which sets the GPIO18 port to the high voltage level for the time interval of ten seconds:
gpio.output(18, True)
time.sleep(10)
gpio.output(18, False)
Input⚓︎
The voltage level of the port set as an input one can be read using the input function. It expects the port number as its only argument. Its return value is True for the high voltage level and False for the low one.
An example of code that reads the state of the GPIO33 port and writes it out follows:
if gpio.input(33):
    print("Port 33 is HIGH")
else:
    print("Port 33 is LOW")
Info
Pull-up/-down resistors that can be set through programs are not supported and it is recommended to use hardware ones instead.
Waiting for a change of signal⚓︎
In case your program only waits for a change of output, it is better to let the operating system do the checking of the input and to put the program to sleep instead of checking the input repeatedly (so called busy loop). This can be done using this library by calling a single function named wait_for_edge. This function expects at least two arguments. The first one is the port number and the second one is either RISING, or FALLING, or BOTH. The function suspends the program execution until there is a change of signal from the low voltage level to the high one in case of RISING, or a change from the high voltage level to the low one in case of FALLING, or both changes in case of BOTH. The return value of the function is the port number where the change was in effect.
Therefore, it is possible to use the following code for waiting for the leading edge on GPIO18:
port = gpio.wait_for_edge(18, gpio.RISING)
if port == 18:
    print("Leading edge on port 18")
else:
    print("This should never happen, there is no timeout and we are only waiting for port 18")
It is also possible to specify the maximum time of waiting for a change (so called timeout) as the argument of the wait_for_edge function. It is time in milliseconds. If the selected time is over and no change on the port has been been observed, the function returns None instead of the port number. The following example would apply to the GPIO18 port:
port = gpio.wait_for_edge(18, gpio.FALLING)
if port:
    print("Trailing edge on port " + str(port))
else:
    print("Time is over")
Cleanup⚓︎
Before exiting the program or when the port will not be worked with any more, it is necessary to reset the state of the port in order to leave the library cleaned up after using it. This can be done using the cleanup function. It optionally accepts the number of the port which you are finishing your work with as an argument. If the argument is not passed to the function, all ports that have been set by the program are cleaned up.
Therefore, one of the following calls can be used for cleaning up all ports (GPIO18 and GPIO33) set at the beginning of this guide:
gpio.cleanup([18, 33])
gpio.cleanup()